Friday, October 2, 2015

Stampin Royalty #297 - Pinspired

So much for more posting in 2015!  Life has been pretty full on in this household - my daughter in the first year of high school so academic expectations have ramped up, although I think it's the interest in boys and social life that has increased here.  Ballet has been given the flick and it's now all about rowing (sadly seasonal), so we need to find another outlet for exercise.  I think lack of motivation on my part was particularly key to the silence over here.

The highlight of my year, apart from significant birthdays and wedding anniversaries was the trip to Scandinavia which we arrived home from last week.  It has been a part of the world I have always wanted to visit and it didn't disappoint.  A bit over 2 weeks in duration and covering Helsinki (Tallinn for a day), Copenhagen and Stockholm. All charming and unique, the people friendly and helpful and the wealth of history made my heart sing.  The weather was perfect, and all were fantastic walking cities.  The food was amazing, with several memorable meals, the downside was that for Australians, it was expensive, but we went knowing that.

Helsinki

Seaplane Museum, Tallinn

Copenhagen

Stockholm

So it was really just a taste, my husband, who has been working in the north of Finland was fortunate enough to see the Northern Lights on 4 nights and took the most wonderful photos.  Need to go back for that.

So to the challenge - Pinspired.  

Suzanne Dahlberg - My Mind's Eye paper (SSS)


With Christmas fast approaching, and card stocks low, there will be a concerted push to create, and create quickly.  I love the simplicity and elegance of Suzanne's card, letting the paper work its magic. I coloured paper with ink as none of my papers match Blackberry Bliss which was my starting point. 

What you need
Cardstock - PTI white;  gold foil
Stamps - Clearly Besotted Sweet Little Sentiments
Ink - SU Blackberry Bliss;  PTI Lavender Moon;  Memento Sweet Plum;  Versamark
White embossing powder


Sunday, April 5, 2015

Spring Colours

I'll just say - we are hoping for an Autumn.  When summer goes from September to April, we are a bit over sunshine and hot days.  Last year we had no Spring and it will be interesting to see whether we get a proper run into winter.  Even then, it won't be cold by northern hemisphere standards.  

Enough moaning, whatever the season, these remain my favourite colours, so fresh and lovely.  In thinking how I would attack this,  Virginia's layers challenge was a great starting point.  


Initially the plan was to use Copics for the background colour, but I don't get my Distress inks out enough, and I think, they gave a better gradient of colour.  The cover plate I have had for ages and really pleased I thought to use it.  

 What you need
Cardstock - PTI white; SU Cool Caribbean, black
Distress inks - Peeled Paint, Mustard Seed, Wild Honey, Worn Lipstick, Picked Raspberry
Die - Clearly Besotted (sentiment);  MFT Cover up
Glossy Accents

On Tuesday, we are off to Ballarat, an hour north west of Melbourne for my cousin's wedding.  If that isn't special enough, my daughter is her one and only bridesmaid. To say she is excited is an understatement, as Catherine is also her Godmother.  Tuesday will be the first time we see her dress.  We know the basic design but it will have to be hemmed and a few final adjustments.

It will be a wonderful opportunity to catch up with our extended family who we haven't seen for some time.  This card is the card we are giving the happy couple, a complete CASE of one of my favourites from Marika Rahtu.  Unfortunately my water colouring was nowhere near her standard so I have resorted to Copics and die cuts.  It is really nice to make a card larger than normal so you can add more layers and detail.


Hope everyone has had a lovely Easter break, and look forward to the Autumn school term!

Thursday, April 2, 2015

Staying Positive for Easter

Term 1 down of the first year of high school - and aren't we glad for the break.  It has been an eye opener for my daughter in terms of assessment and a big step up in responsibility.  This has occupied much of my spare time these last few months as well as becoming a rowing mum.  Don't think this new pastime will work too well with dancing, we shall see.


So, while the creativity hasn't been flowing too well, it was great to come across this sketch and an idea immediately popped into my head.


Given that science is my line of work,  I couldn't resist this stamp set from Clearly Besotted and pairing it with "graph" paper (no idea what brand this paper is).  

What you need
Cardstock - PTI black;  Canson gold
Stamps  and Dies - CB Scientifically Speaking
Ink - Versafine Onyx Black
Black enamel dots

This next card is for my sister in law who has just celebrated a significant birthday and felt she may not have wanted to be reminded of the number.  We will be celebrating with her on Saturday night.  You can't really see it in the photo but instead of sequins or gems I have put droplets of Glossy Accents around the rose.  I can't go past a bit of glitter somewhere, so the black matt has black glitter covering it.


What you need
Cardstock - PTI red, black; X-Press It Blending Card
Stamps - Clearly Besotted Happy Everything, Happy Birthday
Ink - Versafine Onyx Black;  Memento Tuxedo Black
Copics - R27, R39, R59, G21, G24, G28
Glitter Ritz Black
Glossy Accents

This nicely fits with the latest SSS Wednesday Challenge.

Thursday, January 1, 2015

Belated Merry Christmas but an on time Happy New Year

The start of 2015 - my goodness 2014 went fast, particularly the last few months for my family.  My daughter had a great school trip to Canberra - a lot came back sick and all were extremely tired but they really enjoyed themselves and it is a great starting point on the road to independence.  This happened in the middle of an impossibly busy school term and preparations for end of year ballet concerts, which was broadly felt to be the best ever.


This is a photo of the wall, at the Australian War Memorial (a very special place) with the names of Australian soldiers who died at war.  This was taken on Remembrance Day (November), covered with poppies.


This is where we were in her absence ... just an hour south of Brisbane but across the road from the beautiful beaches of Burleigh Heads

While she was away, and, with my husband in between jobs, we thought it would be an ideal opportunity for a whirlwind trip for them to the UK to see elderly relatives.  They had time in London,  seeing a sprinkling of sites (a bit of retail therapy at ballet shops in Covent Garden), and a couple of stage shows, all at break neck speed.  Then time with family in the Midlands and on the south coast.  They returned just after Christmas and had our belated celebration a few days ago.

I have been making a few cards in this blog quiet time.  These 3 cards were for my hairdresser's family.  I am not going to pretend that the inspiration for these cards popped into my head - no,  I needed help.  This first one was for his daughter doing a semester at a university in Chicago. The colour scheme belongs to Cristina K. (My Paper Secret) and I was dying to use my new Waltzingmouse stamps.


This one I have reproduced a number of times from Jennifer McGuire, for his elder daughter, still some more tweaking needed to make the perfect shaker card but it does give people much pleasure when receiving them.  


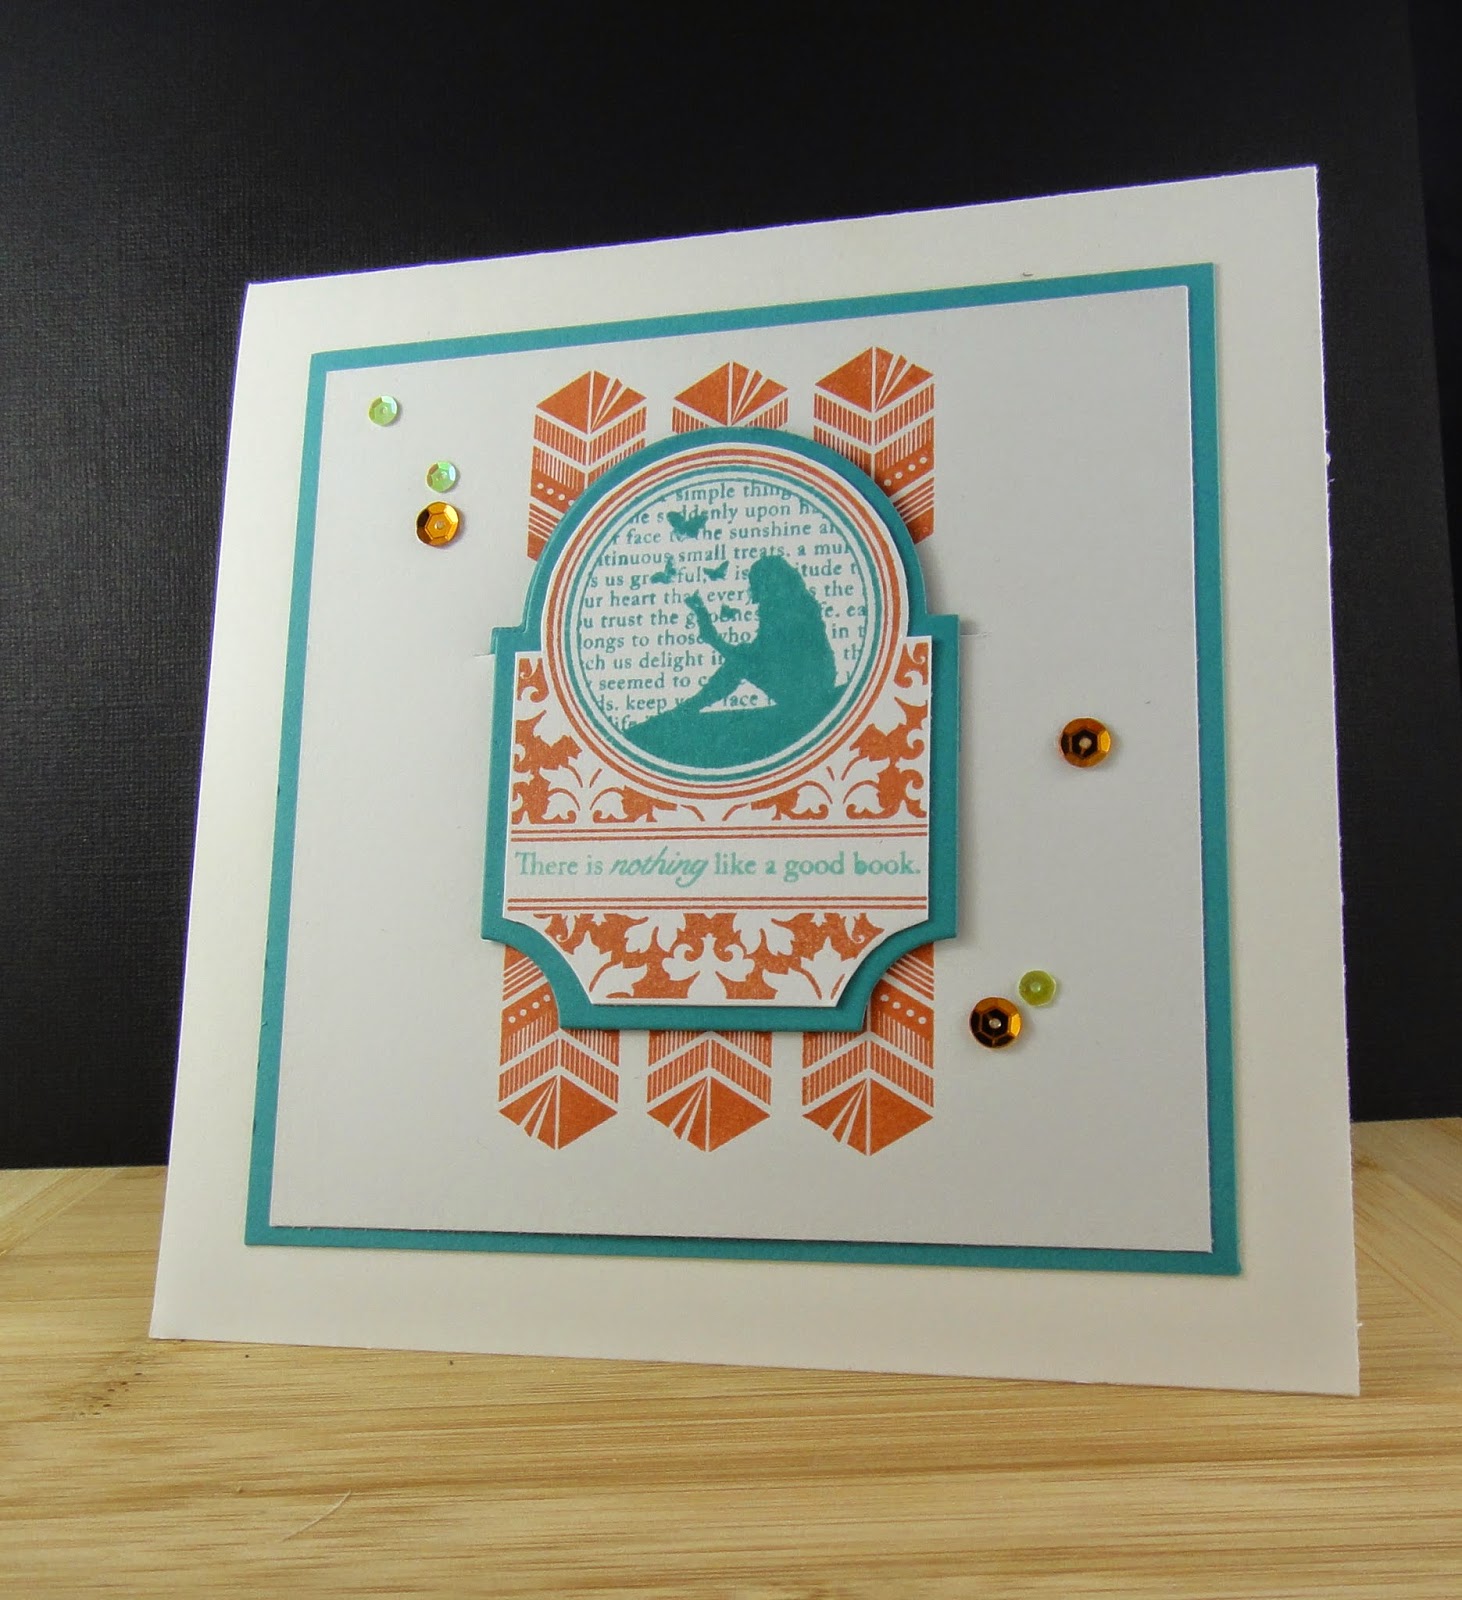
Now, the initial colour scheme and die cut idea came from Laurie Willison but it ended up quite different.  I felt the Art Deco look would make a great card for his wife.


These are the Christmas cards I sent my family away with.  This is not a situation I want to repeat.  I thought (oh so naively) that saying goodbye at the airport would be the hardest.  OH NO!  It was much harder over the next few days, luckily I had lunch with my best friend the next day, and she said - so how are you, (eyes well with tears) - OK not so good, next topic!  (Thank you so much F).  
Again the Jennifer McGuire inspired background. My daughter saw the Mama Elephant stamp set before she left and insisted she have it this Christmas.


My husband's card was an experiment.  I didn't know whether I could heat emboss on foil card.  But yes you can!  We haven't had Christmas Day apart in over 25 years, and even though they were with family (and I was too), it just felt weird.


Ice skating outside the Museum of Natural History (December)

But I wasn't idle over the time they were away.  Pinterest is a wonderful thing, anything I wanted to get sorted there was always several ways to try.  My inks are now organised a la the aforementioned Jennifer McGuire (ink swatches, a great post).  Our bills and budget etc now reside in a beautiful folder by Kikki K (unfortunately it doesn't pay them), and all my new stamp sets have a home in files from Ikea.  We are going there today to get a couple of large frames, one for my daughter's Dr Who print and she wants to put together a frame with tickets and bits and pieces from their trip.  We have done it a few times for previous trips and they are a great art piece.


Deb Frings had a link to these great Dr Who cross stitch patterns from Etsy on one of her Pinterest boards.  I just had to make them, there is another one - the Disappearing Tardis which I made for a couple of her school friends (I really need practice with the finishing touches).  I also had the chance to make some Christmas decor,  these baubles were left over from a bauble wreath I made and love the idea of a topiary.  I then ventured into glass etching with lettering cut with the Silhouette Portrait on the candles, spelling out Noel (hard to see, I know).


I have to add, I have been completely sucked in by the podcast "Serial" from the team at This American Life. It has popped up on my radar a few times as a great series, well written and researched.   I hope they do another season.

So, I would like to say that I resolve to post more in 2015, but resolutions don't have a great history with me and my mojo has been missing for quite some time.  Hopefully, with the re-organisation of my craft room and a general purge, this will re-energise me and use a few more of the craft items I have been hoarding for so long.

Wednesday, October 15, 2014

WMS October 2014 Pyjama Party

We are now into the second week of school, and already the schedule is starting to fill up with concerts for pretty much everything.  Add to that, Grade 6 have their trip to Canberra (Australia's capital), which has become a bit of a tradition, certainly after my time at school.  They get to see Parliament House, National Gallery and several other landmarks, including being at the War Memorial for Remembrance Day.  More important than anything is whether they are staying in the same room as their friends.


With a relatively quiet weekend I was able to put a bit of time into the October WMS Pyjama Party challenge.  I was hoping that the stamps and dies I ordered with my very generous prize from last month would arrive in time, but sadly, no.  I wonder does it have anything to do with increased security with mail services worldwide,  as parcels from the UK usually arrive within the fortnight.

Challenge1:  Embossing with things other than embossing folders
I tried a couple of things, including some Waltzingmouse lace I have hoarded from a few years ago. It worked well but then I couldn't think of what to do with it.  I tried stamps (too thick), gemstones (completely destroyed the paper) so settled on the impression from a couple of layers of card stock.


I just had to pull out Funky Feathers for this one.

What you need
Cardstock - PTI white
Stamps - WMS Funky Feathers
Ink - Brilliance Coffee Bean, Rust;  SU Early Espresso
Clear Embossing Powder

Challenge 2:  Snow is falling
I had decided on sequins for falling snow, but not much beyond that, when I found an old friend - Spooky Tree background.  This was clear embossed then the card coloured with Distress inks


The image didn't look great plonked straight onto a white card but nothing I had worked.  So I coloured white with a Chipped Sappire distress marker.

What you need
Cardstock - PTI white
Stamps -  WMS Spooky Tree Backgrounder, Compliments of the Season
Ink - Versafine Onyx Black;  Versamark
Distress Ink - Salty Ocean, Tumbled Glass; Broken China
Chipped Sapphire distress marker
Clear Embossing Powder
Sequins - Pretty Pink Posh and others

Challenge 3:  Old Pyjamas - Christmas


I have no idea what my oldest WMS Christmas set is but this Vintage background hasn't seen ink in a long time.  The colour palette is from the latest Festive Friday challenge.  I think the fabric on the chairs is a textured self pattern so out came the clear embossing powder again (well, it was still out on my messy desk) and it looks really lovely.


What you need
Cardstock - PTI white
Stamps - WMS Vintage Christmas background;  Compliments of the Season,  Vintage Labels 5
Ink - Versamark;  Versafine Onyx Black;  SU Real Red, Wild Wasabi, Lucky Limeade, Certainly Celery
Clear Embossing Powder
Ribbon;  Twine
Glossy Accents


Challenge 4:  Sketch
This one had me really stumped.  What to do with the little flags at the bottom.  Any of the initial thoughts I had involved several layers of paper, therefore, "unsendable".  PTI has a stamp from a release or 2 ago, Botanical Blocks 2 I think, where Nichole Heady coloured kraft card stock with Copics.  The effect was magic


So I tried to create the same effect on this card.  Instead of white pigment ink, I used white embossing powder.  So once the colouring  started the idea came for glitter flags.


What you need
Cardstock - PTI white, kraft
Stamps - WMS Camelia
Ink - Versamark
White embossing powder - Filigree
Copics - R35, R37, R59, YG93, YG99
Ribbon - SU Real Red taffeta
twine
Crafty Sparkles
white gel pen

 Look forward to seeing what everyone has created.

Monday, October 6, 2014

Copic for Cardmakers Days 7 and 9


This card was inspired by Jennifer's  gorgeous cut out card, which she has done before, but I haven't got around to.  I am still fascinated by shadowing to white and I am sure practice will make a bit more perfect.  


The background is translucent embossing paste which I had a bit of trouble getting smooth.  Very understated effect which is all the card needs.

What you need
Cardstock - PTI white, red;  X-press It blending card
Stamp - Clearly Besotted (printed worksheet)
Various Copic markers


This card was practice in creating backgrounds.  This is harder for me as it requires some freehand creativity on my part.  There is a reason I love stamping - I can't draw!  Though I am pleased with the effect the warm greys produce.

Her hair probably took the longest to get right.  Kathy Racoosin did a beautiful job with blonde hair but when I tried it on this image it just went orange yellow.  I need a lighter hand.  


Still in love with this perfect blend of red - it works so well. For the border I tried another of Jennifer's tricks, edging with Versamark then dipping in embossing powder.

What you need
Cardstock - PTI white;  X-press it blending card
Stamps - Wiff of Joy Hot Chocolate;  Wplus9 Hand Lettered Hello
Ink - Memento Tuxedo Black;  Versamark
Embossing Powder - Ranger Liquid Platinum


Sunday, October 5, 2014

Christmas, Copics and Birthdays


Summer is definitely on the way.  After a few mid-week tasters of the summer heat to come, the weekends have been really lovely and great for getting out in the garden.  Unfortunately it is the end of the school holidays, so back to thinking about school lunches and before we know it, it will be Christmas.  Hence the onslaught of Christmas cards.

I took inspiration for the Festive Friday challenge from the wreath here, and a card from the DT (Ardyth I think) for the panelled background.


The wreath is cut from vellum coloured with a few green Copic markers - they were all over my desk as I am in the middle of the Online Card Classes Copic class!  More on that later.  The sentiment is stamped on the inside of the card.

I think using SU Chocolate Chip DSP might qualify me for the latest CAS-ology challenge


What you need
Cardstock - PTI white, vellum
DSP - SU Woodland Walk
Stamps - Wplus9 Silver Bells (sentiment),  Winter Wishes
Ink - SU Real Red
Various Copic markers
Die - MFT wreath
Twine
Gems - Kaisercraft


Yep, here is another one!  I couldn't decide on spots or stripes so went with both.  


Again, the idea of die cut outs but I wanted a border this time.  Note to self, always cut the BIGGER shape first!


What you need
Cardstock - PTI white, red, ripe avocado
Patterned paper - ?? Authentique
Stamps - Wplus9 Silver Bells (and die)
Ink - SU Old Olive, Real Red, Cherry Cobbler; Versamark;  HA Silver
Embossing powder - Zing! Silver
Spellbinders circle dies

Just a quick aside - this was a birthday card I did for one of my daughter's good friends whose birthday celebration was yesterday (and a bit today).  It is a combination of a few different things that Jennifer McGuire has done over the past year and just haven't got around to.  The flowers are stamped in Memento Luxe ink (Jennifer stamped on Kraft card which I hope to get to soon),  and using translucent embossing paste to adhere glitter.


What you need
Cardstock - SU white, Coastal Cabana
Stamps - MFT Tropical Sensatons,  Birthday Sentiments
Ink - Memento Luxe Pear Tart, Rose Bud, Morocco, Love Letter, Dandelion, Angel Pink;  HA Tide Pool;  Versafine Onyx Black
Wendy Vecchi Translucent Embossing paste
Glitter Ritz Ocean Spray
Viva Pearl Pen - Red

Now this is what I have been spending my time on.  I have learnt so much and been challenged to try new colour combinations.  


Some work, some don't - particularly like the purple and green balloon combination.  And it was good to try a few pink and green palettes, they are my favourites together.


Hair was less successful.  I tried Kristina' s technique (middle top), but struggled with the feathering on the fringe.  Really liked the ideas shown for black,  particularly the way Kelly Marie Alvarez tackles the challenge.


For the flower, I followed Sandy Allnock  in colouring the top  2 flowers.  I have always struggled with reds but  it seems to be working now.  I had never had a go at shadowed white flowers but love the was it turned out.

I was trying to get a combination that would work with the new SU Blackberry Bliss in colour - it took a few goes but got there in the end.  Bottom left was my attempt at a pink to white flower, that bright fluoro pink I have trouble with.


Now this was my favourite and I coloured it several times.  I hadn't used the combination for the leaves before but I think it is my new favourite.  I used Jennifer's red trio and Kristina's purply colours.  Then I had another attempt at shaded white then some blues.

Phew,  that's more homework than i probably ever did - and enjoyed!


Monday, September 22, 2014

The Paper Players # 214


How is this for good fortune - I made this card for my husband only a few days ago and here is a challenge it fits right in with.  I think even he likes having a card made with him in mind, and would be disappointed if I just bought one.


He is very much a motor sport fan, especially motorbikes, so this great embossing folder was a must and it looks particularly good on foil card stock.

What you need
Cardstock - SU black, grey;  silver foil cardboard
Stamps - Uniko Studio Today, Tomorrow and Always Time;  MFT Birthday Sentiments
Ink - SSS Smoke;  Versafine Onyx Black
Embossing Folder - Tim Holtz
Die - MFT Fishtail Flag Stax
Gems

Sunday, September 21, 2014

Stampin' Royalty #246

Tis our season for birthdays, particularly for my daughter's friends.  I was given free reign with the colour combination for this card, so went with one of my favourite palettes I discovered recently on Pinterest.  Would love to have seen this dress in full, spectacular I bet.  


I haven't played along with Stampin' Royalty for a very long time (well, any challenge really),  and was struggling  with a layout.  My daughter wanted to give her friend something with a bookmark as we had given her a voucher to a local book shop.  


So after much fiddling about, I used the PTI Mat Stack 3 die double cut and attached at the top.  I have then put sticky magnets at the bottom to hold it to the page.


This is what was under the bookmark.


What you need
Cardstock - SU white, Bermuda Bay
Stamps - PTI Mat Stack 3, All Booked Up;  WMS Funky Feathers
Ink - SU Bermuda Bay;  HA Tide Pool;  Brilliance Pearlescent Rust
Die - Mat Stack 3
Sequins

Just to finish off, here is another card in my ever ongoing series of using up 12 x 12 paper.  I found this photo in a Christmas catalogue last year and thought I would have a go at reproducing the pattern on the toiletries bag.


The paper is MME Lush 2, I think and the graph paper lent itself to the design.  I stamped the whole sheet with PTI The Sweet Life, and am really happy with how it turned out.  

Related Posts Plugin for WordPress, Blogger...